To Infinity and Beyond - Becoming a Better DopeyBadger (Comments Welcome)

G and I went to the UW football game against Western Michigan. We had free tickets from my work. It was her first football game that she'll remember (she went a handful of times when she was a baby back when we had season tickets). She had fun, but the game overall was kind of boring. No real big plays, nothing terribly exciting. Seems like some of the student traditions have been lost to time. But it was nice to spend some quality 1-on-1 time sharing something that I used to do quite frequently years ago
Did she ask why the students were shouting profanities at one another or is that tradition finally lost?
 
Did she ask why the students were shouting profanities at one another or is that tradition finally lost?

I warned her about that one as we were driving to the game. Alas, ES-** is alive and well. Arguably the loudest the student section was all game. Although I suspect the origin of the chant is now lost on them since the associated song wasn’t happening.
 
12 Weeks to go

That week where I say no, not yet.

giphy (1).gif

9/2/24-9/8/24
Mon (9/2): OFF
Tues (9/3): 5 miles @ Easy (9:16 min/mile, 136 bpm)
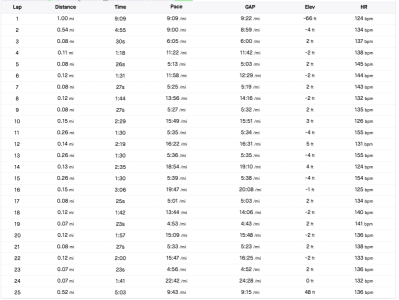
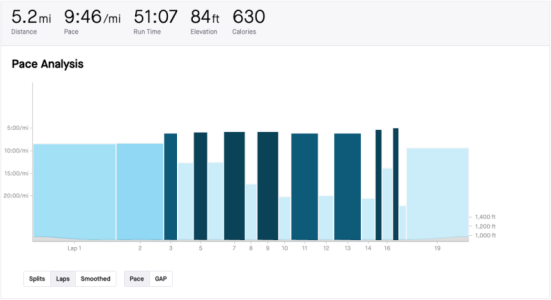
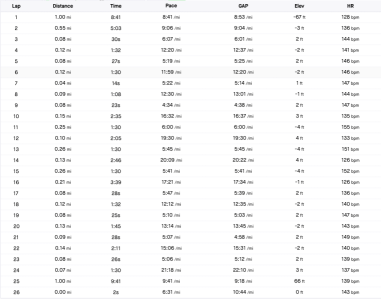
Wed (9/4): (4x30s)+(3x90s)+(4x30s)
Thurs (9/5): 5 miles @ Easy (9:25 min/mile, 133 bpm)
Fri (9/6): 8 miles @ Treadmill
Sat (9/7): 5 miles @ Easy (9:25 min/mile, 129 bpm) + LIIFT More
Sun (9/8): One Mile Race Dry Run

Total Run Miles - 33.1 miles
Total Run Time - 5:07 hours
Total Strength Time - 0:18 hours
Total Training Time - 5:26 hours


Tuesday
Conditions - ⛅ Few clouds, Wind 10mph to ?
Start: Temp+Dew = 75°F + 48°F; FL - 74°F
End: Temp+Dew = 72°F + 54°F; FL - 74°F

I had originally planned on doing the DoLittle 5k on Saturday, but thought to myself "No, not yet." I didn't feel like I was quite in the position I wanted to be to tackle my first one mile race. So I didn't sign up and adjusted my original schedule. I had planned to do a workout on Tuesday with race on Saturday. But moved the workout to Wednesday, and then planned to do a workout on Sunday.

Nice and easy day. My left ankle was a bit achy, and my left big toe is a little sore. Think I bent it back a little during the Sunday LT run. But all in all everything was fine for an easy day.


Wednesday

Conditions - ⛅ Few clouds, Wind 10mph to ?
Start: Temp+Dew = 78°F + 48°F; FL - 78°F
End: Temp+Dew = 65°F + 57°F; FL - 78°F

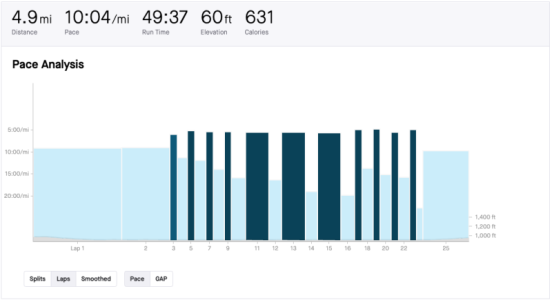
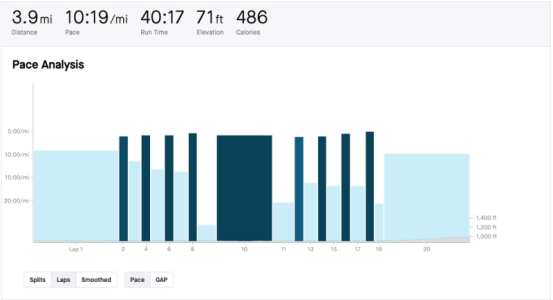
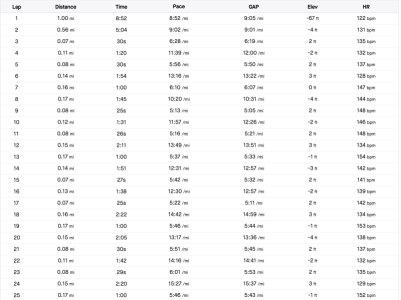
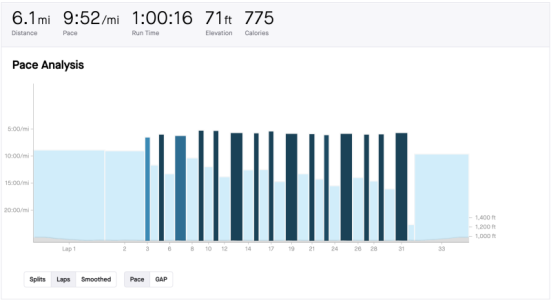
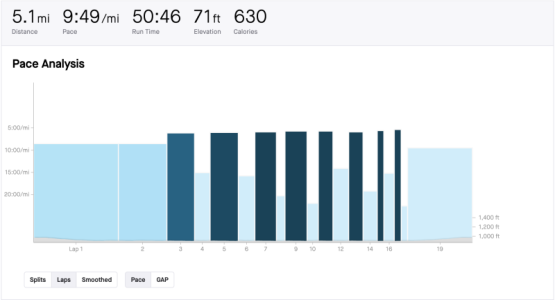
Decided to go back to the 90s reps after having now done 120s reps. Went with a (4x30s)+(3x90s)+(4x30s) which was a repeat of a workout a few weeks back now. Hoping to see some progress.

Screenshot 2024-09-09 at 8.50.34 AM.png

Screenshot 2024-09-09 at 8.50.44 AM.png

Had some spectators for the first four 30s reps. So I probably was doing a little bit of showboating. When I did the last rep I streaked by a neighbor pair that's always out walking their dog around the time I'm running, and he said that he was curious how long I planned on maintaining that pace when he saw me run through the intersection. I told him they were 30s reps, and the last one was in 4:34 pace. He said, "Alright now. Now you're moving." The reps were 6:07, 5:19, 5:22, 4:34. I was jacked up heading into the 90s reps, but did my best to maintain composure. Did the first at a controlled 6:00, then followed that up with a 5:45 and 5:41. I was feeling pretty good about myself after those. Wrapped up the final four 30s reps in 5:47, 5:10, 5:07, and 5:06. The 30s reps had a T+D adjusted pace of 5:15 and the 90s reps in 5:48. Felt pretty good about how the workout went.


Thursday

Conditions - ⛅ Broken clouds, Wind 7mph to ?
Start: Temp+Dew = 72°F + 64°F; FL - 72°F
End: Temp+Dew = 71°F + 64°F; FL - 72°F

Back to six days per week of running, so Thursday easy days are back. Just nice and easy, with no plans on pushing it. Left ankle/toe was still a little something, but not much.


Friday

Steph had to work late. So the first 8 mile LR was on the treadmill. Watched the new Beverly Hills Cop movie on Netflix.


Saturday

Conditions - ⛅ Few clouds, Wind 10mph to ?
Start: Temp+Dew = 51°F + 43°F; FL - 49°F
End: Temp+Dew = 53°F + 43°F; FL - 49°F

First sub-100 morning? It was glorious. I probably actually overdressed wearing a long sleeve, headband and gloves. Also, first sub-130 bpm HR day in a while too.

Wrapped up the workout and did LIIFT More. Kept the long sleeve on, but that didn't work too well so I had to change it out.


Sunday

Conditions - ⛅ Broken clouds, Wind 6mph to ?
Start: Temp+Dew = 62°F + 48°F; FL - 61°F
End: Temp+Dew = 65°F + 49°F; FL - 61°F

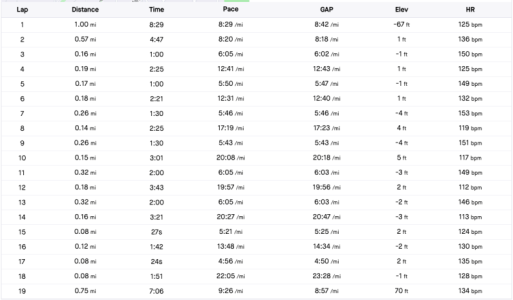
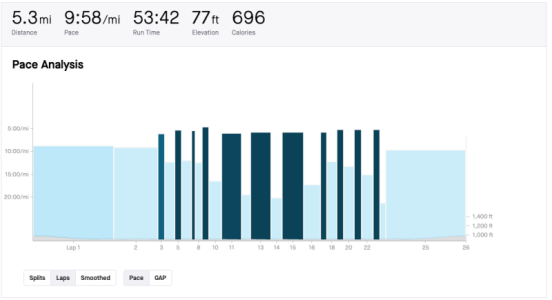
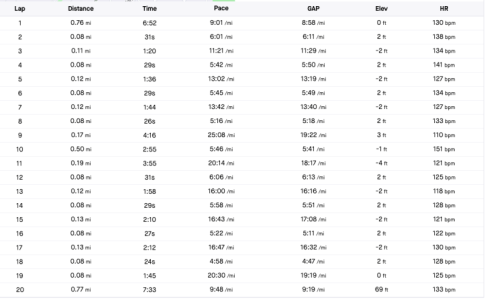
Given the temps, and the planned race I didn't participate in on Saturday, I figured I'd use Sunday as a dry run to test out the pre-race routine. So I did the 1.5 mile WU, then did 4 x 30s reps. Then plan after that was a single 800m rep at a controlled mile pace. The hope was to be progressive in nature and not have the same issue I did in 2020 where I came out the gates way too hot and faded to the 5:42 finish.

Screenshot 2024-09-09 at 9.03.51 AM.png


Screenshot 2024-09-09 at 9.04.01 AM.png

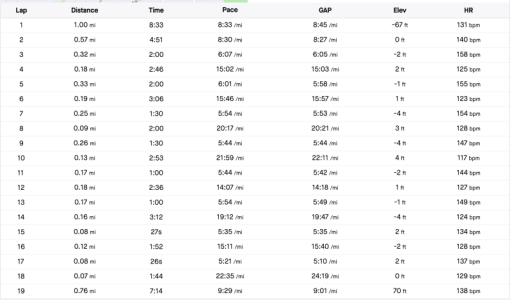
I did the 30s reps in 6:01, 5:42, and 5:45. Admittedly I wasn't feeling that snap in my steps I was looking for through the first three reps. I questioned whether I should even attempt the 800m dry run. But I gave the next 30s rep a good effort and found my footing. Did the last in 5:16 and felt sharp. So I took my time walking to the 800m start line (4 min of elapsed time). I toed the start without a walking/jogging start like I would in a race. I told myself, I get one rep, no restarts, no second attempts. This was like the real thing. I started out by trying to hold back. I felt good about the initial pace and checked my watch for lap pace. Saw 6:20 and was pleased, this was around 100-200m. Then during each successive 150-200m I would crank the effort up a little bit more. Such that the first 600m felt really smooth and controlled. Then once I hit 600m I really locked in and drove hard for the last 200m. Came across the 0.5 mile mark and stopped my lap. Hit it in 2:54 (5:48 pace). I don't have exact splits, but the 200m splits look close to ~43, 43, 42, 44. The beginning of the 800m I was doing 6:00-6:20 pace, and then at the end was maintaining 5:30-5:40. So I nailed the goal of being progressive in nature per the pace splits. It did feel like something I could have continued for a little longer. A full mile is questionable, but it didn't scare me by any means. But the legs were definitely feeling it after the attempt was over. I didn't push the 30s reps too hard and ran them in 6:06, 5:58, 5:22, 4:58. It wasn't until the last rep before I could feel my legs underneath me again.
So it was a good dry run all things considered. The WU of 1.5 miles plus 4x30s reps felt right. Take a little time in-between, and then give it a go. Hold back quite a bit at the start and then just slowly increase the effort over each 200m. Happy with it overall. Next up is more of the same. Just looking for continued progress and staying healthy. Thus far, that has been working.
 
Amphibia Costumes - Anne Armor - Part 9

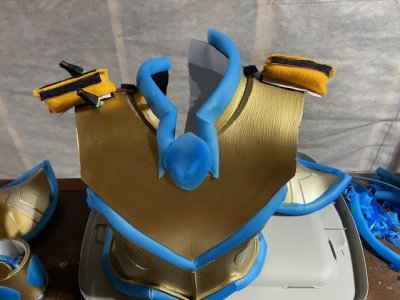
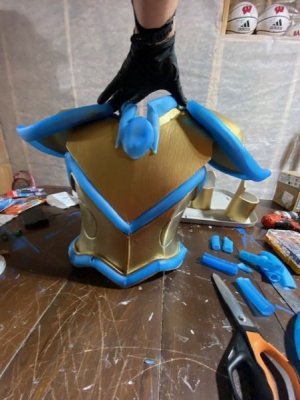
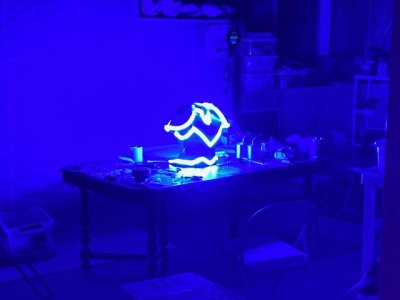
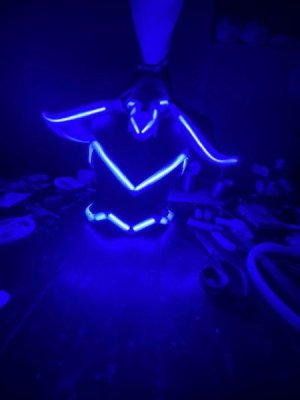
A lot of work, but not a lot of pictures. As of the last update the torso LEDs were put in place, the blue tubing was placed over them, and I had just glued the LEDs to the shoulder pieces. The trick was figuring out how to wire the entire piece together. It's one continuous strand of LEDs with some breaks in it, but only one power source. So I ended up stringing it together by going left to right at the bottom, then right to left through the middle, then attaching the right shoulder, through the neck area, and then right shoulder. Once all of the LEDs were attached (with constant checking that the wiring was still good), then I attached all of the blue tubing.

For each of the shoulders, I decided to put male/female plugs so that the shoulders can be easily removed from the rest of the costume. I also used the same idea with a small pillow under the shoulder pieces like I did for the Darcy armor, so that the shoulder pieces are somewhat flexible. It worked ok, but the weight of the tubing pulled them down so I had to add a second connection point closer to the collar. That's not shown in most of the pics taken in this update though. So here you can see the male/female plugs, the shoulder pillows with velcro, and the small secondary connection point closer to the collar.


thumbnail_IMG_8140.jpg

And here's with the shoulder pieces attached.


thumbnail_IMG_8126.jpg

And then with lights turned on during the day.

thumbnail_IMG_8129.jpg

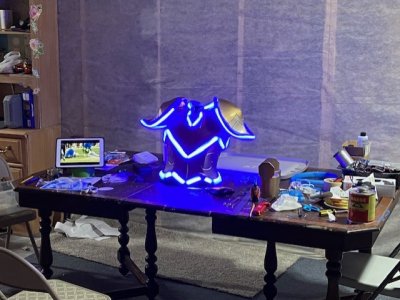
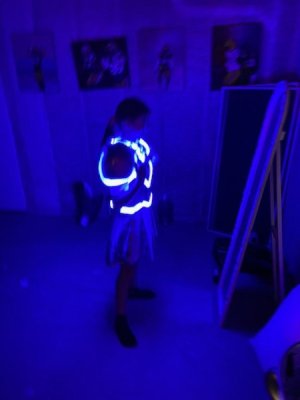
And during the night.


thumbnail_IMG_8130.jpg

thumbnail_IMG_8125.jpg

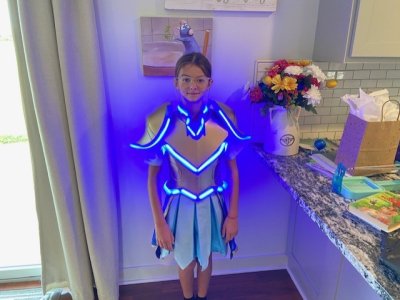
Once we got it to this point, G was eager to try it on with some of the other pieces just to see whether we're making good progress. So we had her put on the Saint James Middle School shirt, the waistband battery pack holder, both 8xAA battery packs, the skirt, and the armor. Here's her LEDs on indoors:

thumbnail_IMG_8132.jpg

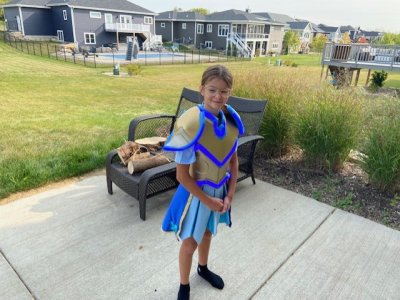
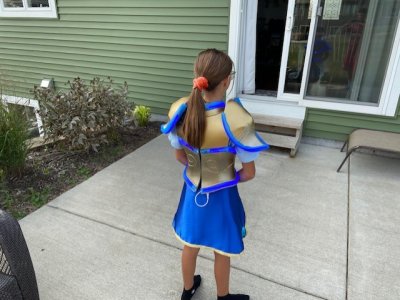
LEDs on outdoors. You can tell that the LEDs are barely noticeable in full daylight.

thumbnail_IMG_8133.jpg

Backside outdoors with LEDs on. Which this will be mostly covered by a cape anyways.


thumbnail_IMG_8134.jpg

And then what she looks like at night (in the basement).


thumbnail_IMG_8135.jpg

So the fit of everything is good and she says it's quite comfortable to wear. I've still got to finish off the shoulder blue tubing somehow and haven't decided how. The cartoon armor has a curl, but that's really hard to replicate with this tubing. So we'll see.

Next - -Anne Armor - Part 10
 
Last edited:
Amphibia Costumes - Anne Armor - Part 10

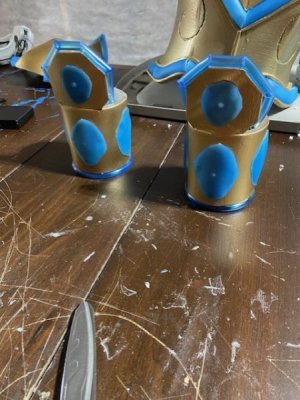
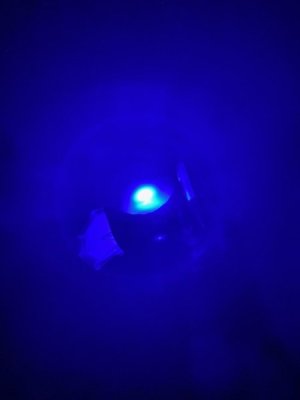
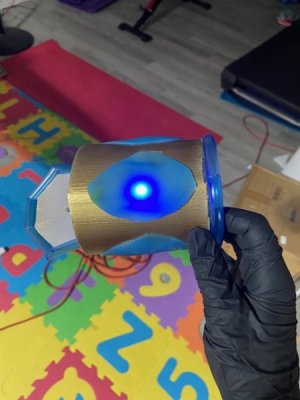
Just an easy and quick update on the hand armor. The foam was already constructed and painted earlier. So I just unfolded the same blue tubing and made little ovals out of it. I drilled small holes for the LEDs to go into, and then glued the ovals to the armor. Then took the smaller blue tubing and placed that around the outside of the edge at the top of the hand.


thumbnail_IMG_8139.jpg

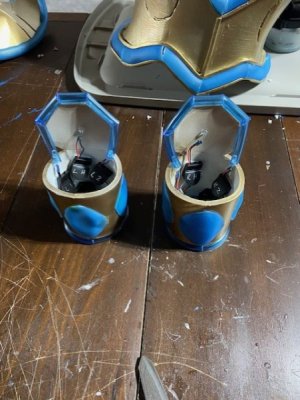
Then I made 14 single blue LED systems with on/off switches and CR2032 battery holders. There were 7 on each hand. I also attached a piece of velcro to each piece so that I could access the batteries relatively easily.


thumbnail_IMG_8138.jpg


thumbnail_IMG_8137.jpg

thumbnail_IMG_8136.jpg

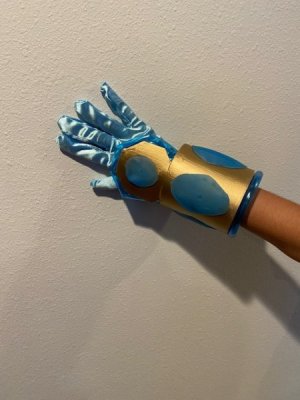
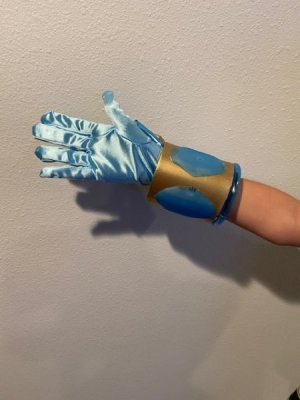
The gloves were hard. I had originally planned on making them myself. But multiple failed attempts at making gloves left me frustrated and I ended up just ordering a pair of light blue gloves on Amazon. I cut them to the correct length, and then I added velcro onto the end. I put velcro on the inside of the hand armor as well (on the edge closest to the elbow). This would make a non-permanent connection in case we needed to remove them for some reason. I had G try it on and she said it felt good.

thumbnail_IMG_8142.jpg


thumbnail_IMG_8143.jpg

There are only five weeks until we leave for Disney. Here's a list of everything that still needs to be finished that I can think of at this moment:

-Make/prime/paint the Anne leg armor
-Make/prime/paint the Anne shoe armor
-Make/prime/paint the Anne crown and attach to Anne hair
-Finish off the Anne shoulder blue tubing
-Attach the Anne cape to the Anne armor
-Attempt to add heat shrink wrap to Anne skull cap LED connections
-Glue Anne skull cap to Anne hair
-Finish Anne hair after gluing
-Make/prime/paint the tubing for Darcy arm armor
-Hand stitch the Darcy shoe armor velcro to shoes
-Hand stitch the Anne shoe armor velcro to shoes
-Test battery length for Darcy animated eyes
-Go back to the original Anne tennis racket and actually figure out Arduino programmable RGB LEDs?
-Create Darcy flame dagger (nothing done on this project to date)
-Create structure to hold costume items for luggage

So not a lot of time to get everything wrapped up...

Next - -Anne Armor - Part 11
 
Last edited:
11 Weeks to go

That week where I say whoops!

giphy (2).gif


9/9/24-9/15/24
Mon (9/9): OFF
Tues (9/10): 5 miles @ Easy (9:32 min/mile, 129 bpm)
Wed (9/11): 5 sets of (30+30+60)
Thurs (9/12): 5 miles @ Easy (9:21 min/mile, 134 bpm)
Fri (9/13): 7.8 miles @ Easy (8:48 min/mile, 139 bpm)
Sat (9/14): 5 miles @ Treadmill
Sun (9/15): (2x120s + 2x90s + 2x60s + 2x30s) + LIIFT More

Total Run Miles - 34.1 miles
Total Run Time - 5:18 hours
Total Strength Time - 0:24 hours
Total Training Time - 5:43 hours


Tuesday

Conditions - ⛅ Broken clouds, Wind 8mph to ?
Start: Temp+Dew = 77°F + 45°F; FL - 76°F
End: Temp+Dew = 75°F + 52°F; FL - 76°F

Body felt good coming into the week, and I don't remember anything off hand about this run.


Wednesday

Conditions - ☀️ Clear sky, Wind 7mph to ?
Start: Temp+Dew = 80°F + 59°F; FL - 80°F
End: Temp+Dew = 73°F + 61°F; FL - 80°F

Looked at the schedule and realized, whoops, the DoLittle 5k was this coming weekend, not last. So I did the completely wrong training week last week. Oh well. It was even hotter this coming weekend so there was no way I was going to do the mile race anyways. But this meant I needed to flip my planned training runs to what I had planned to do the week prior. This was a 5 sets of (30+30+60) which was a repeat workout from earlier in the training plan. Kind of a check-in to see how things are progressing. Goal was around 5:52 pace given the temps.

Screenshot 2024-09-16 at 8.46.09 PM.png

Screenshot 2024-09-16 at 8.46.18 PM.png

Screenshot 2024-09-16 at 8.46.30 PM.png

From memory, those first few reps were offaly stiff. Once I did the 6:10 60s split, then I started to feel better. That's when I started to get on a roll. Then it was a 5:37, 5:46, and 5:46 60s reps. In the Week 1 workout, this is when I had to bail (after 4 sets), but this time around I felt stronger and able. Did the last in 5:38. So finished strong. In total it was 5:39 and 5:38 adjusted temp paces. So only a tiny ahead of goal splits. So ended up happy with this one.


Thursday

Conditions - ⛅ Broken clouds, Wind 11mph to ?
Start: Temp+Dew = 82°F + 55°F; FL - 81°F
End: Temp+Dew = 78°F + 55°F; FL - 81°F

An easy four miler. Nothing to note.


Friday

Conditions - ⛅ Broken clouds, Wind 14mph to ?
Start: Temp+Dew = 80°F + 51°F; FL - 80°F
End: Temp+Dew = 77°F + 53°F; FL - 80°F

Steph had to work late, but MIL watched G for me. So I was able to get this 8 miler outside instead of on the treadmill. This was scheduled at LR pace (around 8:20), but as the run progressed I felt more comfortable a little slower. So I ended up sticking around 8:48 pace and HR said this was the right choice. Hoped for better on the endurance end, but I've still got a ways to go.


Saturday

Steph had to work because of the UW football game against Alabama. So I just did my 5 miler on the treadmill. Body was a little sore, but not too bad.


Sunday

Conditions - ⛅ Broken clouds, Wind 10mph to ?
Start: Temp+Dew = 78°F + 62°F; FL - 79°F
End: Temp+Dew = 74°F + 63°F; FL - 79°F

Forgot that Steph had to work, but honestly because of the heat it was probably a blessing. So I waited until late evening and then did most of the run after the sun went down. This one was a doozy. It's a wind down R workout. So we open with 600m (2 min) reps and work down to 150m (30s) reps. So based on how slow my body has responded to the first few reps in each workout, I knew that those 600m were going to be tough coming out the gate.


Screenshot 2024-09-16 at 8.40.22 PM.png

Screenshot 2024-09-16 at 8.40.34 PM.png

No surprise to me, but the first 600m rep was too slow. Goal was around 5:53 pace. So 6:07 and 6:01 were too slow. But as each rep progressed I was feeling more and more comfortable. Did the 90s reps in 5:54 and 5:44. Then the 60s reps in 5:44 and 5:54. Lastly, the 30s reps in 5:35 and 5:21. Body felt good throughout and pleased with this one. Overall average pace was 5:42 adjusted pace. So right on target!

Happy with the week and on to the next one! Hopefully no more schedule mishaps, but no promises! I'm feeling closer to being in good enough shape to attack the mile.
 
Amphibia Costumes - Anne Armor - Part 11
Alright, let's continue that rundown of the things that need to be completed with only 4 weeks until we step on the plane to Disney.

-Make/prime/paint the Anne leg armor
-Make/prime/paint the Anne shoe armor

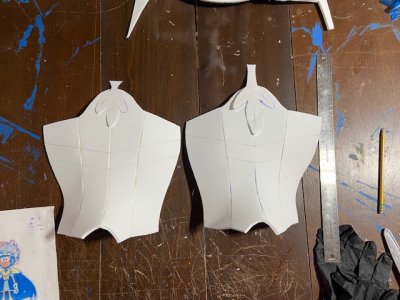
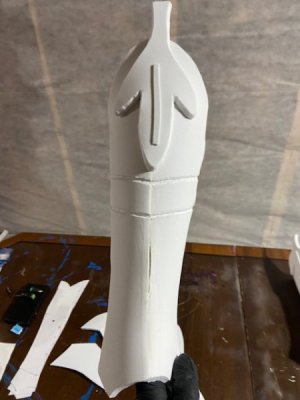
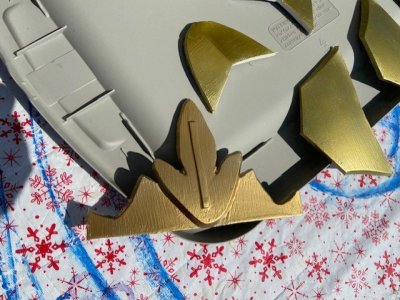
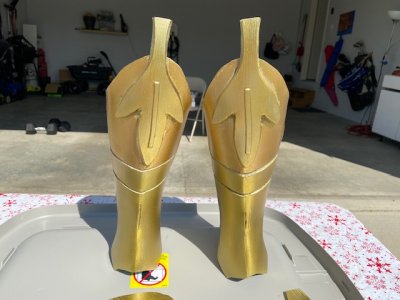
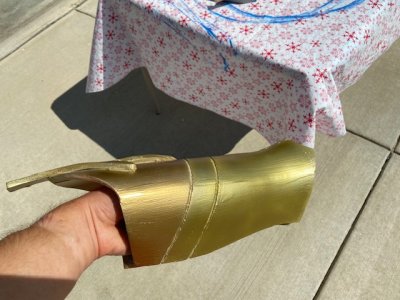
For the leg and shoe armor pattern, I went with the same Kamui Cosplay patterns as the Darcy costume (shin #6 and full shoe guard). I just reduced their sizes to about 75% to be the right size for G's legs/shoes. Anne has a leaf on the front of the leg armor, so G and I had to decide what size we wanted it.

thumbnail_IMG_8141.jpg

We ended up going with the larger one. I also carved in the lines seen on Anne's leg armor (in reality they're probably shoes). The leaves have a small line on them likely representing the stem. So we took a trip outside to look at real leaves to decide whether the line should be coming out of the leaf or go into the leaf. What we learned is that the front of leaf tend to have the stem go inwards, and the back of the leaf tend to come out. So we chose to make it look like the front of the leaf and I was to carve inwards.


thumbnail_IMG_8146.jpg

Whoops... I had it pre-settled in my mind what I was going to do, so when it came time to carve it, I instead put on a piece of foam instead. Ugh. The majority of these pieces were in 6mm EVA foam, but the line was in 2mm foam. I had to carry my tail between my legs to show G and she was initially perturbed about the mistake, but then got over it.

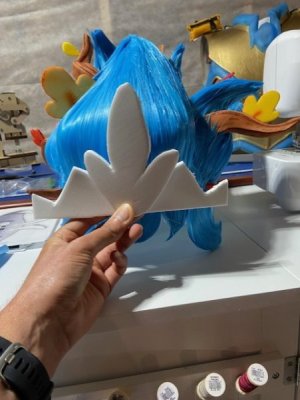
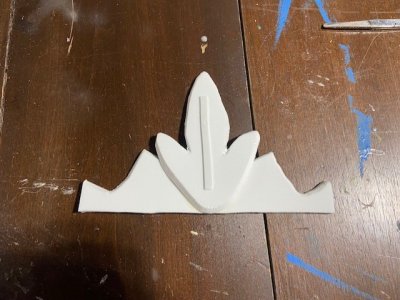
I also carved out a piece of foam into the shape of Anne's crown.


thumbnail_IMG_8144.jpg

And then did some tapering with the dremel.


thumbnail_IMG_8148.jpg

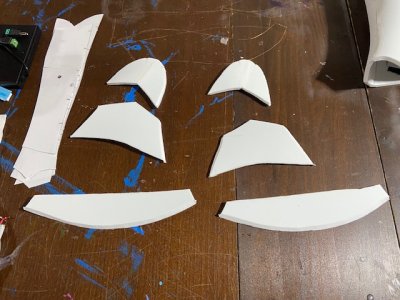
We also then cut out the patterns for the shoe armor, and then did some small edits to align the pattern with the actual slip on shoe's we'll be using.


thumbnail_IMG_8147.jpg

We then went through and added the Kwik Seal caulk to all the joints, sanded it, and used Flexbond Primer to prep it for painting.

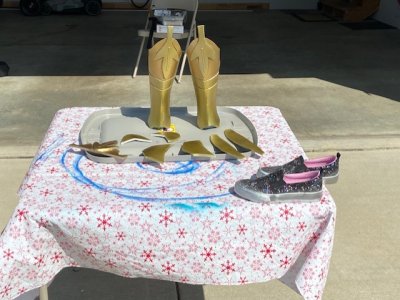
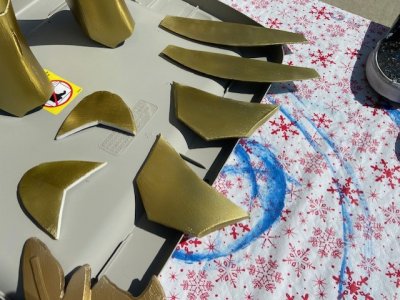
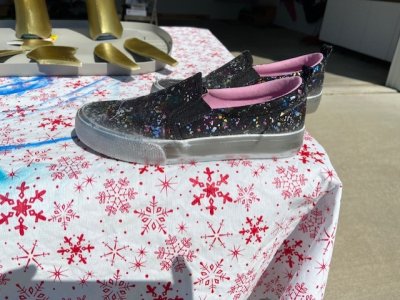
For painting, the armor was to be the same two tone gold color we used on the torso armor. All of the gold armor was base painted with the Alclad II Pale Grey Glossy Base (ALC 315). Took two coats. The upper leg armor minus the leaf, and the crown were painted with two coats of Alclad II Pale Gold (ALC 108). Then all of the shoe armor, lower leg armor, and the leg armor leaf were painted with two coats of Alclad II Gold Titanium (ALC 118). Honestly, the Gold Titanium might have warranted a third layer but I ran out of paint, and decided it looked good enough. Lastly, the shoes were painted with a single layer of Flexbond, then a single coat of Alclad II Bright Silver Candy Base (ALC 701). Because of the surface, the single coat was sufficient for the candy base unlike when painting on the foam took >3-5 coats to get a good look. I order some Candy Electric Blue for the base of the shoes, but that hasn't come in yet. Lastly, after giving everything a day to dry, all finished items were clear coated with Alclad II Aqua Gloss Clear Coat (ALC 600).


thumbnail_IMG_8149.jpg

thumbnail_IMG_8151.jpg


thumbnail_IMG_8152.jpg

thumbnail_IMG_8153.jpg

thumbnail_IMG_8155.jpg

Like most of the other armor pieces, the legs are held together by velcro on the backside.

-Make/prime/paint the Anne leg armor ✅
-Make/prime/paint the Anne shoe armor ✅
-Make/prime/paint the Anne crown ✅ and attach to Anne hair

Some other things were completed without picture updates:

-Finish off the Anne shoulder blue tubing ✅

For the blue tubing, I was trying to match the curve seen at the top of the shoulders. But the tube just doesn't want to bend that way. So instead I just pinched the ends together and then used the Loctite PBS glue to seal them together.

-Attach the Anne cape to the Anne armor ✅

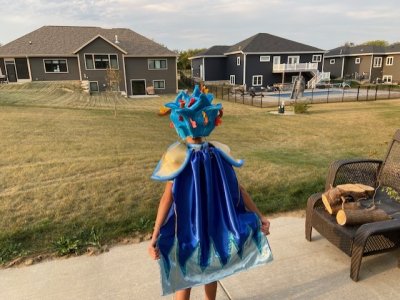
For the cape, we had previously finished the cape a few weeks ago. All that needed to be done was to sew on the velcro onto the cape top. I used the same procedure as the Darcy cape. I put a cord through the top of the cape, and then synched it to make it bundled together. Then I sewed on velcro using the machine, and then aligned those locations with velcro on the back of the costume. I've hidden a few connections underneath the shoulder armor.

Next - -Anne Armor - Part 12
 
Last edited:
Amphibia Costumes - Anne Armor - Part 12 & Anne Hair - Part 18

-Make/prime/paint the tubing for Darcy arm armor ✅

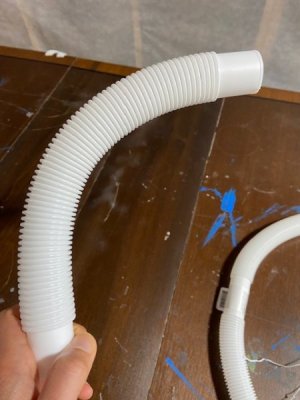
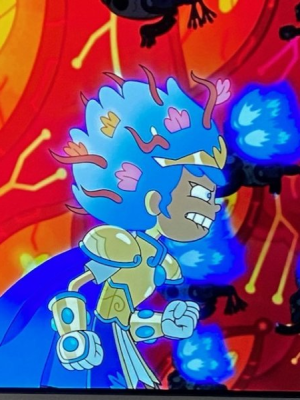
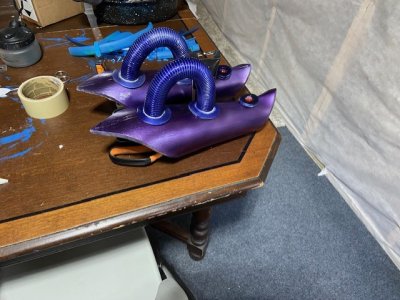
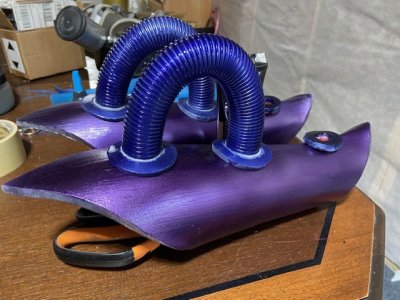
For the tubing on the Darcy costume, I went to Home Depot and tooled around a bit trying to look for something that was the right shape, texture, and size as the tubing seen on Darcy's arm bracers. Eventually I settled on a piece of plastic intended for dryer hosing (I think, it's been so long since I bought it I don't remember exactly anymore).

thumbnail_IMG_7757.jpg

I cut off the ends and just planned on using the center piece. I used the heat gun (while wearing heat resistant gloves, respirator, and eye protection) to help bend the form a little more aggressively than it wanted to be naturally. I then cut out some small circles on 6mm EVA foam, and placed those around the ends with Barge All-Purpose Cement. Once that was in a satisfactory position, I used Flexbond Primer on everything to prep it for painting. For painting, I used the Alclad II Silver Candy Base (two coats), and then the Candy Indigo (matching other accents for Darcy) in three coats. Allowed that to dry overnight, and then put the Aqua Gloss Clear Coat to finish it off. I used the Gorilla Micro Precise Super Glue to attach the tubing to the arm bracers.

thumbnail_IMG_8156.jpg


thumbnail_IMG_8157.jpg

BTW, here's a close-up of the Anne shoes with Silver Candy Base that didn't make it into the previous update.

thumbnail_IMG_8150.jpg

-Hand stitch the Darcy shoe armor velcro to shoes ✅

Right, so this was a major pain. Weeks ago I had attached the velcro using just the glue on the backs of them to a pair an old pair of Ride 13s. And it worked for a few days, but eventually the glue detached and it wasn't sticking to the fabric of the shoes anymore. So I knew I needed a different approach. I had the bright (read terrible) idea of hand stitching the velcro to the shoes. Let me tell you, I was fully unaware of how much is going on inside these running shoes. I had tried to get my needle to go through the velcro plus shoe, but in some certain areas, it just wasn't happening. At one point I tried to use a needle nose pliers to get a good grip to get it through, and it bent the needle. Then I tried hammering the needle end, and it broke off the tip into the shoe. Thankfully I was able to pull it out with the pliers. That's when I got the drill out. I used a drill bit and made some holes around the heel of the shoe. Like I said, there's a lot going on in there. But eventually I made my way through. It still wasn't easy though. Took about 4 hrs to hand sew the velcro onto each shoe, and honestly it'll hold up for a few wears probably, but it's pretty shoddy at best. But it'll do what I want it too, which is allow me to attach foam armor pieces to my normal (since retired) shoes. Still got to do the same to G's except I might try a different idea because her shoe's are smaller and even less room to work inside them.

-Attempt to add heat shrink wrap to Anne skull cap LED connections ✅

So the connections on the skull cap LED connections weren't fully covered. It wasn't until I did the Anne torso armor that I realized I had the necessary heat shrink wrap tubing to do it. But it wasn't feasible or practical to detach the already placed LEDs on the skull cap and re-do it. So I tried to cut the shrink wrap and then weave it around the connections. And in some places that worked. In others it didn't. I went to Google and found it's common to use hot glue to stalk these connections, so in lieu of being able to do it properly, this is what I did as an alternative. I gave it a few hour test outside with it on to see if everything would hold up fine, and it was all good. So I was ready to finalize the hair.

-Glue Anne skull cap to Anne hair ✅

This was a one-shot deal. I placed the skull cap into the blue wig hair/foam piece. It took some maneuvering to get it into the correct position. Thankfully I had the ear holes to guide me mostly. Then it was a matter of using the Barge All-Purpose Cement and Gorilla Micro Precise Super Glue to attach the two pieces together. I also added an elastic band from the two side burns so that G could wear it like a helmet. She plans on putting concealer make-up along the band and she thinks it'll mostly hide it.

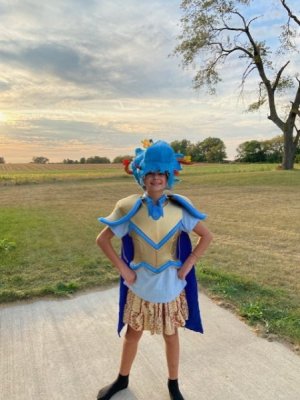
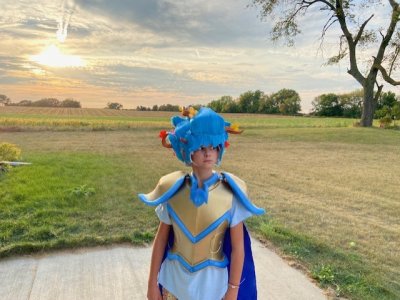
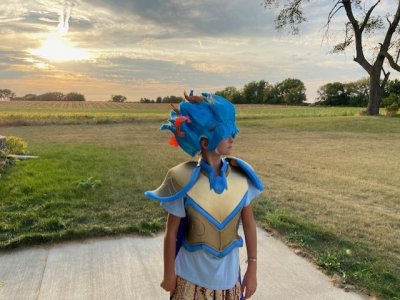
Then it was finally time for a true moment of truth. We spent months making the hair, and weeks making the armor. But at no point has she worn both at the same time. I had some concern that the hair might interfere with the armor collar at the back of the neck. So we decided to go with a full upper armor try-on. G had her hair done in a braid that swirls along her head. Then she put on the blue swim cap that will protect her hair from the foam, but also provide a high grip surface to keep the blue hair from moving much. Then we got the torso armor on complete with t-shirt, shoulders, and cape. Then we placed the hair helmet on. So no lower half of the costume (no skirt/leg armor/shoe armor). And it looks AWESOME! She's very very excited with how it's looking.

thumbnail_IMG_8160.jpg

thumbnail_IMG_8167.jpg

thumbnail_IMG_8169.jpg

She said the weight of it is akin to a bicycle helmet. Which is great, because she thinks it shouldn't be much of an issue to wear it long term. The other important part is that there's a nice 1-2 inch gap between the bottom of the hair piece and the collar of the torso armor. So other than trying to look straight up, there's no interaction between the two pieces. It honestly worked out better than I could have hoped. There's still a little bit to clean up on the helmet, but by in large it's what we wanted it to look like.

thumbnail_IMG_8165.jpg


1715027748768.png

So what's left now?

-Finish Anne hair after gluing
-Hand stitch the Anne shoe armor velcro to shoes
-Test battery length for Darcy animated eyes
-Go back to the original Anne tennis racket and actually figure out Arduino programmable RGB LEDs?
-Create Darcy flame dagger (nothing done on this project to date)
-Create structure to hold costume items for luggage

Honestly, I'm happy with all the progress that I made this past weekend. I was really nervous, but I flew through some of the things. We're getting to the point where the two main costumes are finished and then it's just a matter of the tennis racket and dagger. And if those things don't get completed in time, then no one would be the wiser anyways. So we're in a really good place with four weeks to go now.

Next -
 
Amphibia Costumes - Anne Hair - Part 19

DISASTER!


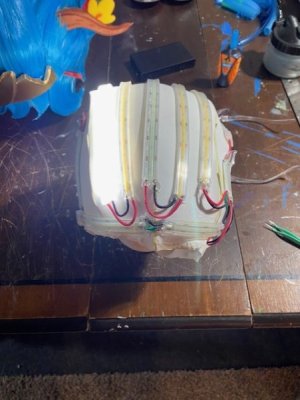
So now that the Anne hairpiece was completed and glued together, and the crown was painted, I could attach the crown to the hairpiece. I used superglue because I assumed it would maintain the best hold between the wig hair and the EVA foam. As I was gluing it together, I held it in place and heard a small click sound. So I waited until the super glue was fully bonded and then plugged in the hair to check. Thank goodness it illuminated. But it looked off. Like the illumination was present, but dampened, and didn't look like there was any blue LEDs. So I flipped the hair over to look at the underside, and it was even more apparent that not all the LEDs were working. In fact, it almost looked like only one single ~50-75 LED strip was lit and the other 900+ were off. That's when the dread started to set in that a connection must have disconnected, and now the hair piece was fully glued with cement glue and super glue. So it was going to be really challenging to fix the problem.

I sat for a bit and weighed the pros/cons of trying to attempt to disconnect the two pieces from each other and fix the LEDs. Like the hair glowing is super important to the project. And I still have the opportunity to fix it because we're still at home. But the risk is that I might ruin either the blue hair or the skull cap in the process of trying to cut the two away from each other. Ultimately, I came to the conclusion that it was a risk I was willing to take, and would accept the consequences. So I slowly started trying to cut the two pieces away from each other. In some places where it was just cement glue, it wasn't terribly hard. But in the places where I used the super glue (like the side burns) it was really tough. Thankfully, after about 40 min, I was able to get the two separated. I plugged in the LEDs again to verify the issue.


thumbnail_IMG_8170.jpg

Clear as day that only one strip was illuminated, and it was easy to find the one soldered connection that was no longer attached. So I cut off the tip of the soldered wire + hot glue, re-stripped the wire, and thankfully had enough room to make an easy solder connection again. At least this part was relatively easy and only took about 5-10 min.

But now the question was how to move forward. Do I re-attach it, and then hope everything goes fine in the luggage? Do I take my soldering equipment to Disney on the off chance I need to fix something? Should I make other arrangements to get this piece to FL? At this point, Steph and I decided the best course of action is to leave the two pieces detached. Then, I'll bring the skull cap in a hard case carry on luggage that I can be gentle with during transport, and the blue hair part can go in checked luggage. Once we get to Disney and verify it's still working, then I can super glue them together Tuesday night/Wednesday morning prior to the Thursday night party. Then when we return home from Disney, the whole piece will go in checked luggage, and I can fix it if it breaks again at home. I will also bring the soldering equipment, but only use it if absolutely necessary. There's also a separate feeling I should just make a second skull cap with LEDs on the off chance one breaks, and the other remains in tact. I'd estimate that particular piece would cost $20-25 to remake.

So thankfully, disaster averted for now. If anything, it's a blessing to show how fragile it can be under the right circumstances, and hopefully these pivots we're taking will keep it safe.

Next -
 
Amphibia Costumes - Anne Hair - Part 19

DISASTER!


So now that the Anne hairpiece was completed and glued together, and the crown was painted, I could attach the crown to the hairpiece. I used superglue because I assumed it would maintain the best hold between the wig hair and the EVA foam. As I was gluing it together, I held it in place and heard a small click sound. So I waited until the super glue was fully bonded and then plugged in the hair to check. Thank goodness it illuminated. But it looked off. Like the illumination was present, but dampened, and didn't look like there was any blue LEDs. So I flipped the hair over to look at the underside, and it was even more apparent that not all the LEDs were working. In fact, it almost looked like only one single ~50-75 LED strip was lit and the other 900+ were off. That's when the dread started to set in that a connection must have disconnected, and now the hair piece was fully glued with cement glue and super glue. So it was going to be really challenging to fix the problem.

I sat for a bit and weighed the pros/cons of trying to attempt to disconnect the two pieces from each other and fix the LEDs. Like the hair glowing is super important to the project. And I still have the opportunity to fix it because we're still at home. But the risk is that I might ruin either the blue hair or the skull cap in the process of trying to cut the two away from each other. Ultimately, I came to the conclusion that it was a risk I was willing to take, and would accept the consequences. So I slowly started trying to cut the two pieces away from each other. In some places where it was just cement glue, it wasn't terribly hard. But in the places where I used the super glue (like the side burns) it was really tough. Thankfully, after about 40 min, I was able to get the two separated. I plugged in the LEDs again to verify the issue.


View attachment 896207

Clear as day that only one strip was illuminated, and it was easy to find the one soldered connection that was no longer attached. So I cut off the tip of the soldered wire + hot glue, re-stripped the wire, and thankfully had enough room to make an easy solder connection again. At least this part was relatively easy and only took about 5-10 min.

But now the question was how to move forward. Do I re-attach it, and then hope everything goes fine in the luggage? Do I take my soldering equipment to Disney on the off chance I need to fix something? Should I make other arrangements to get this piece to FL? At this point, Steph and I decided the best course of action is to leave the two pieces detached. Then, I'll bring the skull cap in a hard case carry on luggage that I can be gentle with during transport, and the blue hair part can go in checked luggage. Once we get to Disney and verify it's still working, then I can super glue them together Tuesday night/Wednesday morning prior to the Thursday night party. Then when we return home from Disney, the whole piece will go in checked luggage, and I can fix it if it breaks again at home. I will also bring the soldering equipment, but only use it if absolutely necessary. There's also a separate feeling I should just make a second skull cap with LEDs on the off chance one breaks, and the other remains in tact. I'd estimate that particular piece would cost $20-25 to remake.

So thankfully, disaster averted for now. If anything, it's a blessing to show how fragile it can be under the right circumstances, and hopefully these pivots we're taking will keep it safe.

Next -
You are a patient, patient man.
 
And then what she looks like at night (in the basement).
That is going to stand out in all the best ways at night for the party.
So thankfully, disaster averted for now. If anything, it's a blessing to show how fragile it can be under the right circumstances, and hopefully these pivots we're taking will keep it safe.
I agree. I hearken back to a series of little mistakes I had been making in training for and running half marathons that began to cause much better challenges for me when I started training for Dopey. Those mistakes were very minor and causing no serious issues for half marathon and 10K/Half Marathon challenge weekends, but could have been disastrous at the marathon distance. I'm very happy I discovered all those issues during training so I had time to try new solutions and practice with them during training.

Also, I think the luggage plan is great. It's why I always pack my race gear in the carryon suitcase so I know I have it in case luggage gets delayed. Once year, I had to change my flight 12 hours before departure, so I even paid the Southwest boarding group upgrade to guarantee I would not have to check the race gear suitcase.

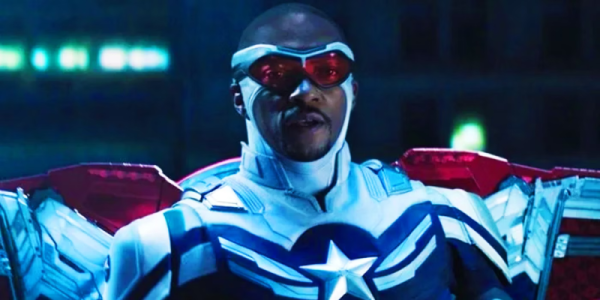
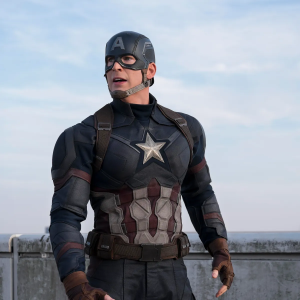
Last, I'm impressed with your craftsmanship and know how. I come up with all sorts of fun costume ideas that I love, but I cannot figure out nor do I possess the skills to make them work. Nevertheless, I still plan to run a race as Sam Eagle Captain America. Maybe this upcoming Disneyland 5K next year since it's Marvel themed, and I can get a picture in front of Great Moments with Mr. Lincoln.


FREE VACATION PLANNING!

Dreams Unlimited Travel is here to help you plan your ideal Disney vacation, with no additional cost to you. Our Authorized Disney Vacation Planners offer expert advice, answer all your questions, and constantly seek out the best discounts, ensuring you get the most value for your trip. Let us handle the details so you can focus on making magical memories.
CLICK HERE


New Posts


DIS Tiktok DIS Facebook DIS Twitter DIS youtube DIS Instagram DIS Pinterest

Top